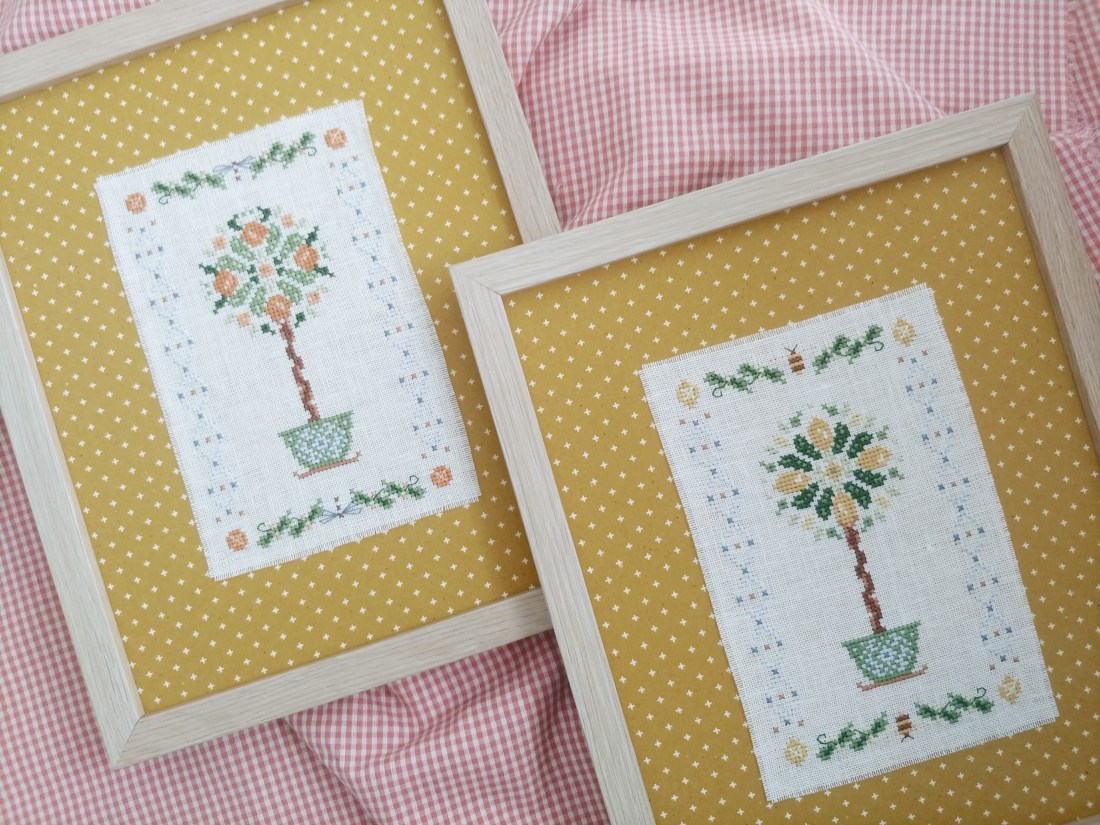
While I was preparing for the most recent Stitching in the Mountains Retreat, I was considering patterns that would fit our theme of scent. After some to-ing and fro-ing, I remembered my Great Aunt (Auntie Pam, we called her), who had a beautiful kumqat tree in a big, fancy pot, right by her front door. They smelled incredible, and it seemed like the height of sophistication to have a topiary fruit tree!
Pam was a very genteel woman, and her house was full of antiques. She and her husband had travelled and brought back treasures and I remember thinking, when I was tiny, that one day, I wanted a home with a big fruit tree in a pot by the door…
This pair of designs is in honour of Auntie Pam, and to celebrate the joyful scents of oranges and lemons. It’s funny, the old nursery rhyme kept running through my head, while I was stitching them: “Oranges and lemons, say the bells of St Clemens…”, and I was intrigued to learn that the rhyme’s origins are unclear, but it’s thought to reference over a dozen different church bells that could be heard in 17th century London (you can learn more, and hear it HERE).
I stitched these in DMC, and I’ve included both Cottage Garden Threads and cotton overdye conversions, which you can use, depending on what you have in stash. The patterns have a stitch count of 59w x 95h, and I stitched them 2 over 2 for the cross-stitches, and 1 over 2 for the back-stitches.
My models were stitched on 32-count “Soft Ivory” by Zweigart, but they would look equally lovely on blues, greens, lemons or oranges! And being small, they’re a great way to use up scraps from bigger projects. I also think they’d be beautiful stitched on a higher count fabric, and made into little pin-pillows.
As for the finishing, I did a little trick that I like to use to avoid custom framing. I took 2 standard size, inexpensive frames (8 x 10-inch) as my starting point. I chose some quilting fabric that I felt harmonised with the designs and colours well (the one I used was called ‘Add it Up’ by Alexa Marcelle Abegg for Ruby Star Society – it’s in an ochre-y yellow).
I cut two pieces of this fabric, with a 2-inch wide border larger than the frames. I then took my stitching, and cut them about 1.5cm (just over 1/2-inch) from each stitching edge. You can pull a thread from the linen on each side to mark where to cut, if that’s easier…
Then, I used neutral English Paper Piecing thread (or any strong sewing thread) to stitch the pieces to the centre of the backing fabric, using a running stitch just outside the design edge. Once I had both pieces stitched on the backing fabric, I laced the backing fabric to some foamboard, they way you would usually lace your stitching. I centred them by marking the centre of the design with a pin and matching it to the centre of the foamboard (see my latest Flosstube for an explanation).
Lastly, I pulled a couple of threads from each edge of the stitching, to give some nice texture. I find this method really helpful for making the most of ready-made frames – and for using up that stash of quilting cotton I can’t stop adding to!
Whether you frame these or make them into smalls, I hope you enjoy stitching them, or perhaps gifting them – I thought these might make a fabulous (but quick) housewarming gift, and would look wonderful in a kitchen. Where would you display them?
You can find the hard-copy pattern or PDF in my Etsy store, and the pattern and CGT threadpacks at Cottage Garden Threads (I receive a small commission from sales of threadpacks associated with my designs at CGT – many thanks for their support of independent designers). Happy stitching!

