
An antique reproduction
I must confess – I have a real love for Victorian needlepoints and have been collecting them for some time. When I reproduced “Mary Barton’s Work” last year, I wasn’t sure anyone else would want to stitch it – and I’m thrilled that Mary’s weird little bird found so many homes with you. But I couldn’t leave her alone…
“Among the roses” is a reproduction of another Victorian era needlepoint from my collection – this one a little larger. I love the deep red roses and the graceful perch of the bird. And, just like all my reproductions, I have learnt a great deal from this treasure from the past.
I reproduce antique needlework for two reasons: to share with others these beautiful treasures and to learn from them. As a designer, I feel as though I’m learning to design better by studying these works so closely. And in this reproduction, I learnt some valuable lessons about colour and harmony.
The antique original was stitched entirely in wools, on a fully stitched background. Now, I wasn’t going to stitch the background – but, as always, I want to make my reproduction as close as I can to the original. This is a lengthy, and very detailed process – charting each stitch exactly and matching the original colours as closely as I can. This last part of the process typically finds me trying and pulling out lots of colours to find the best match – the ones that appear best from an initial pull may not be the best once you start stitching. Colours that sit alongside affect each other – and can ‘read’ quite differently than you expect.
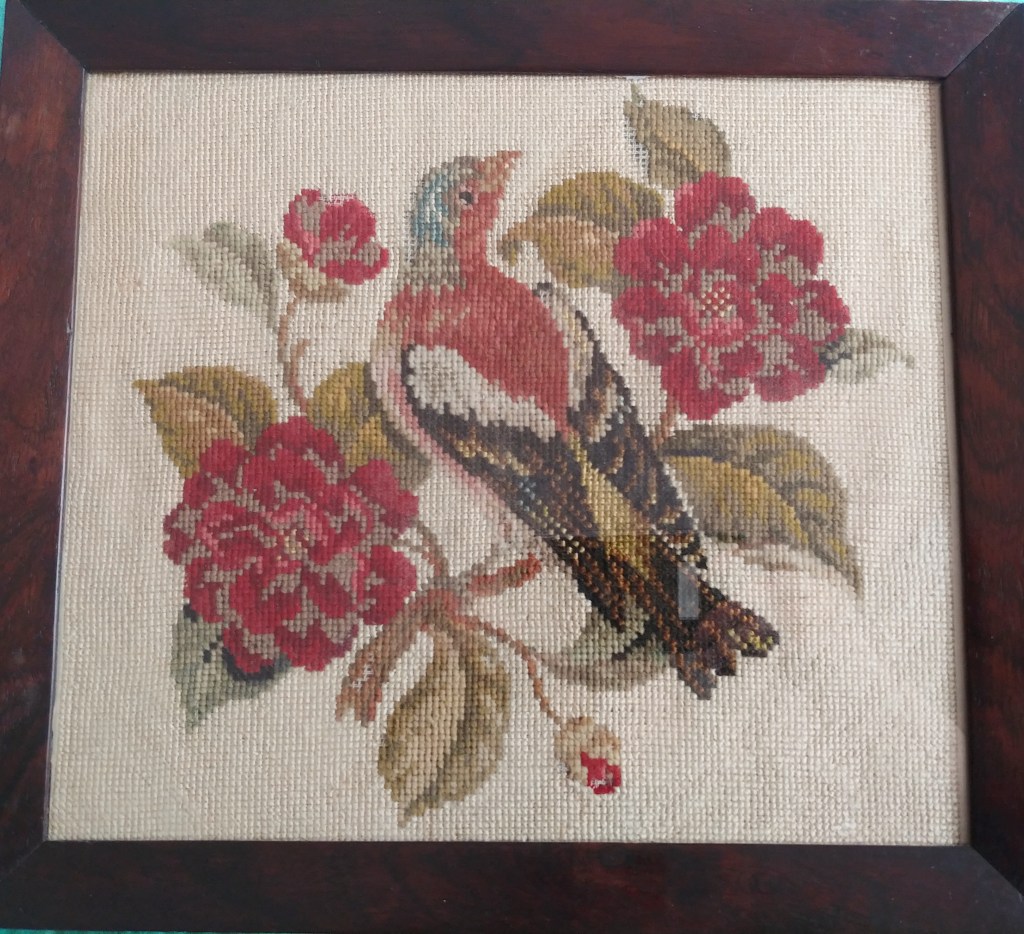
This is an enjoyable process usually, as I puzzle out the best possible matches – learning more about colour as I go. But this one was unusually trying! The most difficult were two colours on the breast and back of the bird. In this original, they are distinctly orange – pinky, dusky oranges, but oranges nonetheless. And so I tried all the oranges I could get my hands on – and some orangey- pinks, some orangey-browns… And none worked. All of them were too dark or much too bright – and stole the focus of the whole piece.
So I made a choice – I have chosen to use two colours that are more pink, but that better harmonise with the entire piece. All reproductions are creative works – they’re not simply ‘copies’ – they involve making creative decisions. I hope you’re pleased with the final result and enjoy stitching this next little bird too.
For the purists, the oranges in the original antique are closest to DMC 21 & 22 (although much softer) – if you would like to experiment yourself and try some orange silks or overdyes – by all means. And do let me know your results!
My model was stitched 2 strands over 2 on 32-count ‘Soft Ivory’ by Zweigart using a mix of Gentle Arts, Classic Colourworks and Weeks Dye Works overdyed cottons. The chart has a full DMC conversion. As there are quite a lot of colours, and some of them with only a few stitches, feel free to use the overdyes that you have in your stash and swap in the DMC for those you don’t.
As always, I can’t wait to see how you make this bird your own – stitch it on hand-dyed fabric, on aida or on higher-counts… Use DMC, or convert it to silks… It would also look lovely on PTP “Ale” or whatever you used for Mary Barton. Oh, and for framing – if you stitch it in 32-count – it will fit into a standard 8×10-inch frame like mine!
The chart is available from stores now and in my Etsy store in both hard-copy and PDF. Oh, and leave room on your wall – I think we might be working on a flock 😉

Beautiful work! Also enjoyed your article.
Debra O. Bradley
LikeLike
Thanks so much for stopping by…
LikeLike