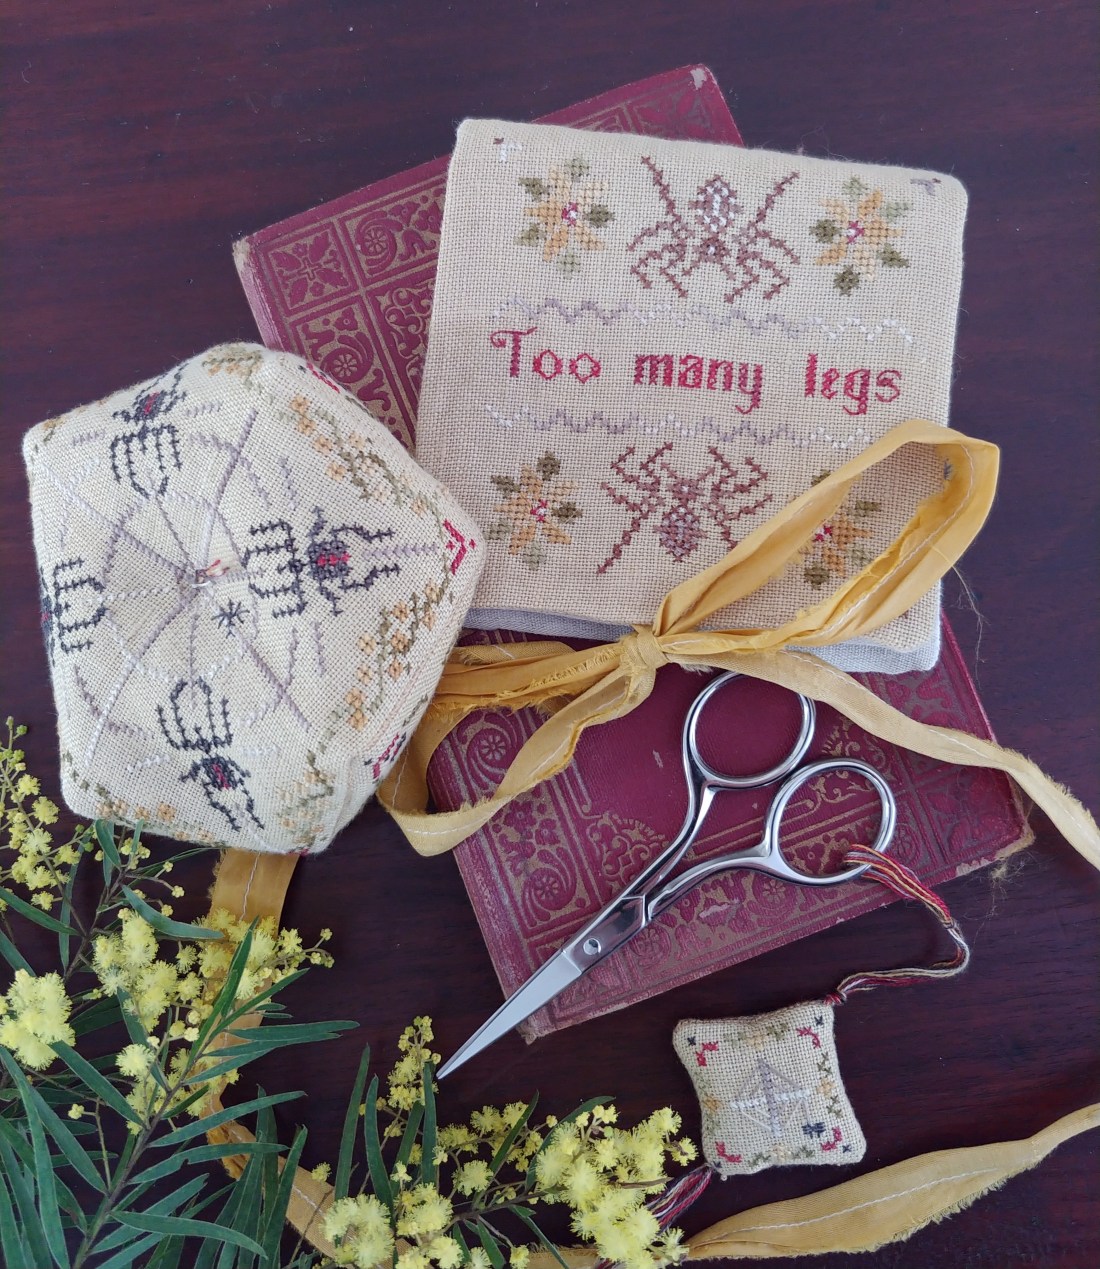
First, an apology to the arachnophobes – feel free to run to the next page! I’m not exactly enamored of spiders myself, but I do find them fascinating. But overall, I think they have just too many legs!
I designed the Redback Biscornu first – last year in fact – when I was thinking about how to do a Halloween design that fits in Australia. It’s not a traditional holiday here, and falling in Springtime, all the dark spookiness just doesn’t seem to fit. So … spiders and flowers? I hope you enjoy this quirky take on Halloween, or just enjoy stitching the less pretty parts of nature…
Redbacks are a tiny, but extremely poisonous spider. Contrary to popular stereotypes, we’re not constantly battling off spiders with every step down here – in fact, I’ve only seen a Redback once! Huntsmen Spiders (as portayed in the Huntsman Needlebook) are an entirely different thing. They’re unnervingly huge – they can be as large as your hand – and revoltingly quick. Although not poisonous at all, they are common visitors to homes, and I’ve spent more than one night on the couch because there was a Huntsman in my bedroom that I couldn’t catch!
To complete the sewing set, I designed the Itsy-Bitsy scissor fob – so you can set up your stitchy spot with all manner of spidery goodness! They are fun and quick to stitch, and I was able to use the gorgeous new “Bookshelf” range of Cottage Garden Threads – my collaboration with CGT and which are designed to complement Fox & Rabbit’s beautiful hand-dyed linen.
In my model, all three pieces were stitched on 36-count “Hogbristle” by Fox & Rabbit Designs, using 6 colours of the Bookshelf range – Hearth, Hot Coffee, Cobweb, Leatherbound, Candlestick and Chamomile Tea. Threadpacks and the chart are available in stores and from my Etsy store. As always, there’s a full DMC conversion in the chart, but I just love how the “Cobweb” thread looks just like a spiderweb glinting in the sun!
Finishing instructions
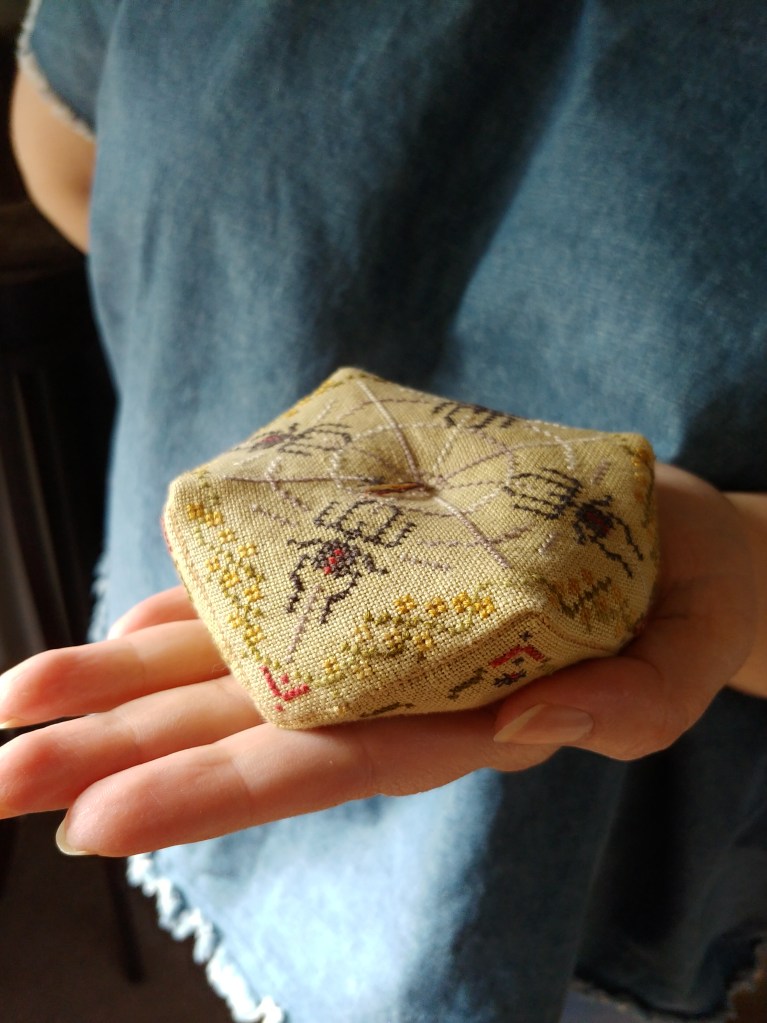
Redback Biscornu
Now, don’t be scared by a biscornu – they’re actually much easier to stitch and finish than you’d think. There are lots of tutorials and videos online – this one by the wonderful designer, Tiny Modernist is very clear. My extra tips are:
- Use 2 strands of thread for the backstitch lines around both pieces of the biscornu. These can be either coordinating with your fabric (so the seam disappears) or contrasting (to make the seam a feature).
- Use a sharp embroidery needle for the whip-stitches when constructing the biscornu. I find this helps me just catch the backstitches, not the fabric underneath.
- If it’s your first biscornu (yay! you can do it) – use 32-count and/or a stiffer fabric like Aida. This makes the construction a little easier.
- Don’t overstuff your biscornu. I use crushed walnut shells (as I like the weight), and never overstuff – remember, you’ll be securing the centre of the biscornu and need to leave some give for that.
In this finish in particular, I didn’t use buttons to tie the centre of the completed biscornu together – I used 8 or so scraps of thread left over from stitching. I threaded these together on a sharp embroidery needle with a large eye and tied a simple knot about 1.5 centimetres from the end. Starting from the top of the biscornu, I sewed this through the centre of the web, leaving the knot on the outside of the fabric.

Turning the biscornu over, pull the threads taut and tie another simple knot loosely. Before securing the knot, press the head of the needle into the centre of the biscornu to pull it taut and tighten the knot over the head of the needle as it’s pressed into the biscornu centre. After the knot is pulled tight, pull the needle off the threads and trim the remaining threads to about 1.5 centimetres about the knot – leaving a little tuft the same length as on the front. This finishing is optional, but I like how it uses waste thread.
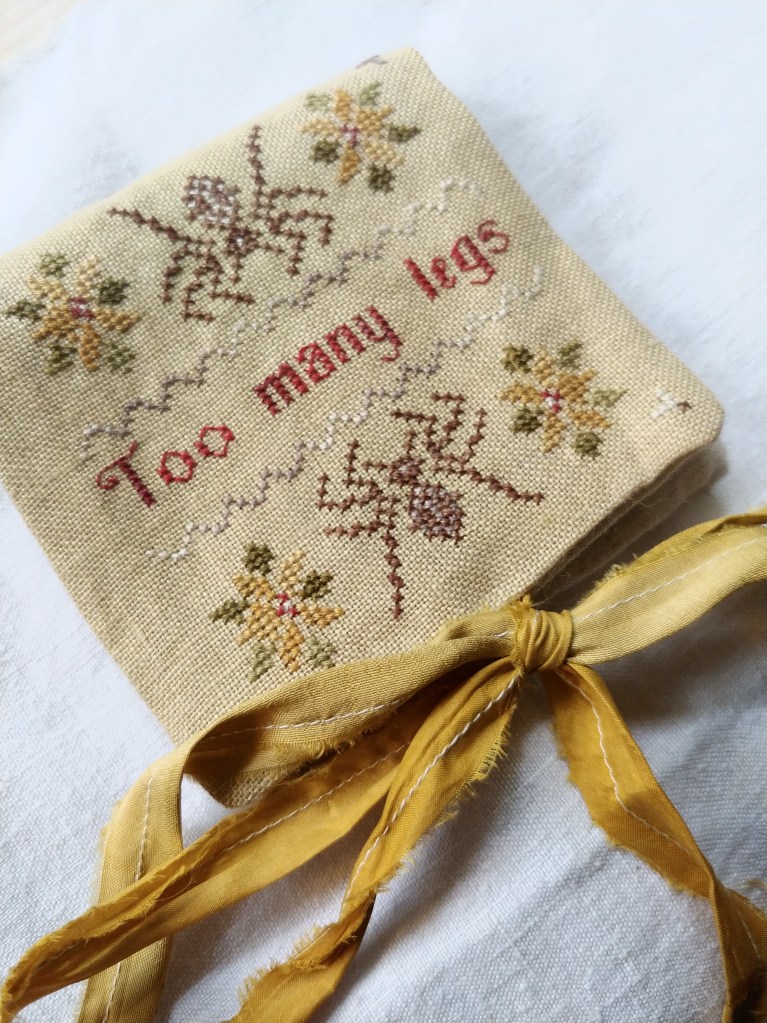
Huntsman Needlebook
I love needlebooks – and this one just makes me laugh! Although I’m very neat with my stitching, I’m a bit rough-and-ready when it comes to finishing. I like things to look a little handmade, so I don’t worry too much about perfect seams. This is a very easy finish that doesn’t even involve measuring! I used a sewing machine, but this could easily be sewn by hand too.
You will need:
- your stitched needlebook cover piece
- a piece of coordinating fabric about the same size as your stitched piece
- a plain piece of calico, linen or other fabric for the lining
- a small piece of wool felt for the leaves of the needlebook
- silk sari ribbon or other ribbon for the ties
- pins or quilter’s clips
- strong sewing thread
- a pencil.
Place your stitched piece and the coordinating fabric right-sides together. Stitch along the top edge of the design, about 1 cm from the edge of the stitching (or your preferred border width – just make sure the borders around all sides of the stitching are roughly the same).
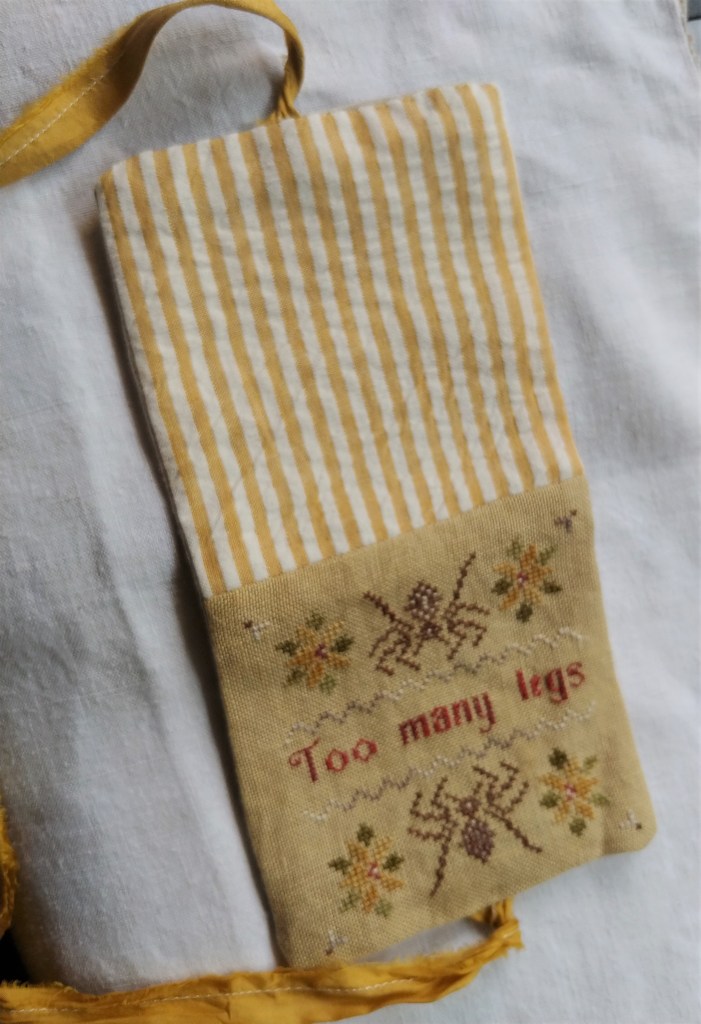
Press the seams open. Place this sewn piece and the plain lining fabric right sides together. On the reverse of the lining fabric, use the pencil to roughly draw a sewing line about the same border width from your stitching and use this size as a guide around the whole rectangular piece.
At the same time, cut 2 pieces of ribbon for the ties. I made mine about 50 cm each (about 20 inches). If you’re using silk sari ribbon – iron the ribbon out flat, then fold in half lengthways and iron flat. Then, sew a seam along the length of the ribbons for extra strength. Leave the frayed edges as they are – they make a beautiful texture.
To construct the needlebook, lay the stitched/coordinating fabric piece down, right side up. Then, lay the two ribbon ties with short ends hanging over the edges in the middle of the shorter sides of the rectangle and pin or clip in place. (These will be stitched into the seams). Scrunch up the lengths of the ribbon and place them in the middle of your right-side up stitched piece. Then, sandwich on top the lining fabric, right-side down. Make sure to maneuver your drawn sewing line evenly (you may need to flip the sandwich upside to check this against the edges of your stitching.
Pin or clip all layers together, making sure that the ribbon ties only cross the sewing line at the points where you want to secure them. Sew around the edges along your drawn sewing line, leaving a gap of a couple of inches at the back short edge for turning out. Before you turn it out, trim the edges to approx. 1 cm (half and inch) and clip the corners. Turn out the needlebook and press.

Whipstitch the opening shut with a few hand-stitches. Then, take your wool felt and if you have pinking shears, cut a piece a little smaller than the size of your needlebook (and simple, straight edges are fine too). Attach by securing with a few running stitches along the “spine” of the needlebook – making sure to only sew through the felt and the lining – not the front of the needlebook.
Press again, tie your ties and you’re ready to go! I’ll be making up another of these shortly and I’ll attempt to video the process – I’ll add a link here when this is complete.
Itsy-bitsy scissor fob
I chose to finish this by stitching right sides together, leaving a small opening and turning out. I filled it loosely with crushed walnut shells and whip-stitched the edges closed. This is a little fiddly being so small, but the effect is very cute. For the tie, I used some lengths of the Cottage Garden Threads that I used for stitching – about 6 of them, and threading them on a sharp embroidery needle with a large eye.
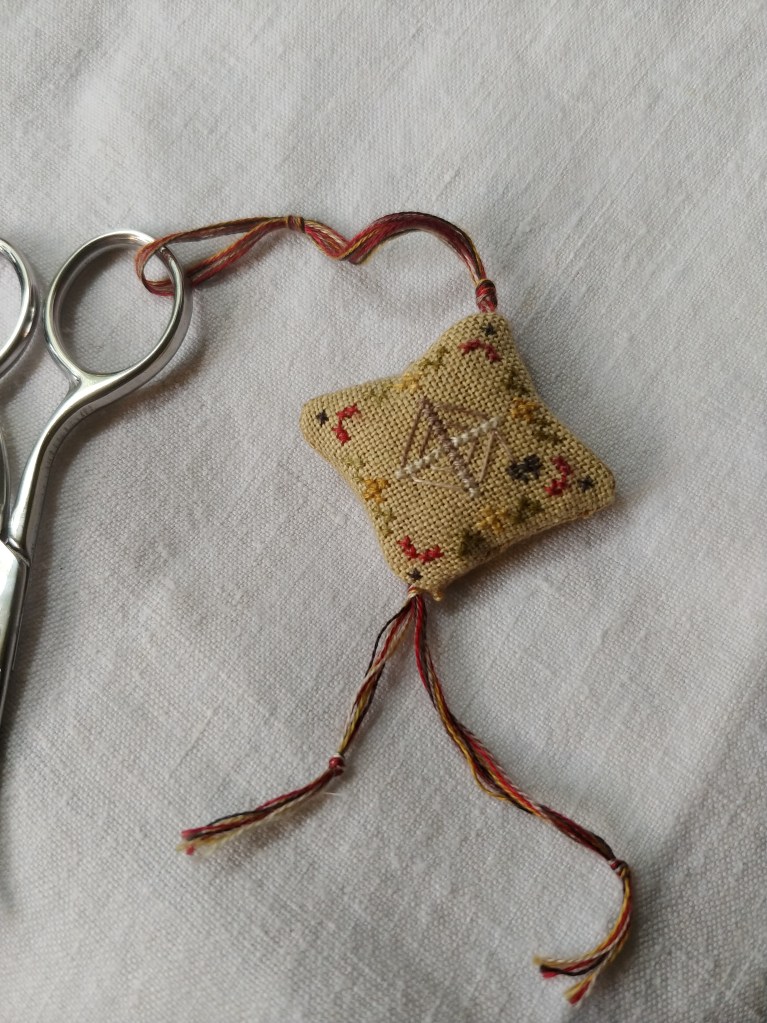
Tie a simple knot about 1 inch from the end and stitch through one corner of the fob all the way into the fob and out the opposite end. Leave a good length at your starting point and thread your needle through one handle of your scissors. Tie a knot about one inch from these handles to secure both lengths of thread together. Then, tie both lengths together in a simple knot at the top of the scissor fob, before carrying the length along the back of the fob, and securing both lengths together with a knot at the bottom. Take your threads off the needle and secure the returning length with another knot a little longer than the first end. Trim both ends to about an inch.

Again, this kind of finish is completely optional – I’d love to see what you do! Happy spider stitching!
